Electrical: Wiring
The clear hose routed to the new startup control panel box is how Jack laid out his initial harness lengths. He prewired the button, switches, and activity lights to the new control panel, and built a harness that feeds out the top end of the panel with a 10-inch lead. The control panel on the left side of the cage bars is a new addition to Big Red. The push button turns over the starter. The switch below that with the red safety cover is the equivalent of turning the ignition key to the ON position. The other buttons (from top to bottom) are to select the fuel pumps (one or two), the cooling fan override, and the dual electric water pumps used in the Land Speed/Top Speed mode. Each switch has an activity light to inform RJ that the corresponding circuit is being supplied power. This panel replaces the aluminum control center that previously resided on the driveshaft tunnel to the right on RJ’s seat. Jack installed a quick-disconnect Deutsch connector on the startup control harness. The new overhead switch panel was reserved for less-critical systems: headlights, fuel prime, transmission cooling fan, Racepak data logging system, and Racepak A/F controller. The fire bottle controls and master power-off
switch were built on a pedestal that’s within RJ’s reach. The master power switch is one of two main shutoffs. There’s also one in the rear tail panel, where it easily can be controlled by track/safety crew.
Jack used Deutsch DT Series connectors because he liked their easy-to-assemble weatherproof connection and solderless crimp pins.
Jack used a myriad of wiring crimpers and cutters. He gets a lot of use out of his DMC contact crimping tool, and he keeps a full inventory of contacts. The contacts are used in the round and rectangular Deutsch connectors on Big Red. The contact pins are the male portion (shown), and the sockets are the female portion. They are crimped/indented on four sides. Each contact pin and socket has an inspection hole to confirm that the wire is inserted to the correct length. Jack may look comfortable in RJ’s seat, but he works all over inside the car. Jack quickly learned how to easily get in and out of the rollcage. Every connector received a wrap around the wires. Whenever possible, Jack used the Deutsch connectors

with the shrink- boot-adapter option. Once the Deutsch connector was installed, Jack added a boot to seal the connector and wires. The boot was shrunk in place to keep out the elements.
Jack even built his own specialty tools. When you’re picky like Jack, and want exactly the same amount of threads sticking out of the front of the switch without scratching the switch panel, tightening switches to a panel can be a pain! There was little clearance to tighten the back-up nut to lock the switch to the panel. Jack ground down a 9/16-inch wrench to fit the slim space between the switch the panel. Even connections inside the car got the weatherproofing treatment, as demonstrated on the startup control panel connection. Big Red doesn’t always have windows. When RJ got to the finish line at Pikes Peak, all the competitors had to park at the Summit and wait for all the competitors to finish. During that time it hailed, and some moisture got in the car. No connection is safe from the elements in a race car.
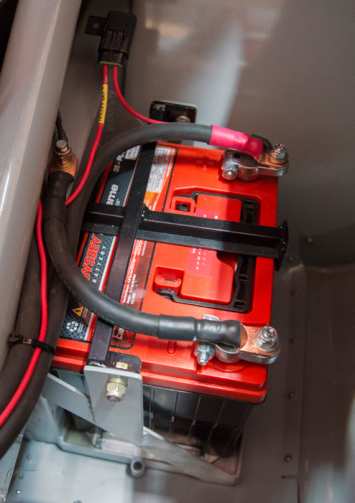
Jack installed two Longacre ® battery disconnect switches in the car: one in the trunk and one in the passenger compartment on the fire system control pedestal for RJ to reach in case of emergency. Each switch has a 175-amp continuous rating (with 1,000-amp peak) for the battery circuit and a second circuit for high-capacity alternators that carries a 125-amp rating and 500 peak amps. To make for a clean installation, the switch in the trunk has its positive circuits bridged with a special U-shaped busbar fabricated by Jack. He coated most of the busbar with liquid electrical tape to protect the excess surface from possibly arcing on tools and other items.
Big Red has used a few different brands of batteries over the years. They’ve settled on an Odyssey 35-PC1400 12-volt battery. The high-compression race engine needs as much juice as possible to start, so the 850 CCA does the job. It’s mountedto the side of the frame rails, forward of the tail panel, and out of harm’s way. It’s also mounted as low as safely possible for a lower center of gravity. Its location counteracts the weight of the driver as well as the overall weight over the front tires.
These Thomas & Betts military-spec Ty-Rap cable ties are not ordinary; these have no notches as found on standard cable ties. There’s a little stainless-steel tang that locks in any position to hold the ties where you want them. Ordinary cable ties use a plastic lock, which usually does a good job, but for a serious car like Big Red, ordinary just doesn’t cut it. For extra perfection, Jack used a Ty-Rap ERG50 cable tie tool to cinch the tie to the correct amount of tension (selected on the tool’s dial), then cut the tie for a scratch-free end.
Big Red’s new LED brake-light bulb won’t get a lot of use. Just kidding! With Baer Brakes, RJ can do a lot more late-braking, so he will put the brake-light bulbs to good use. This bulb is Sylvania’s LED replacement for the old, standard 1157 bulb. Every component on Big Red is getting an upgrade. Compared to incandescent bulbs, LEDs create more light, produce little heat, and use a fraction of the energy. Jack created new harnesses for the entire car. Every harness is documented by
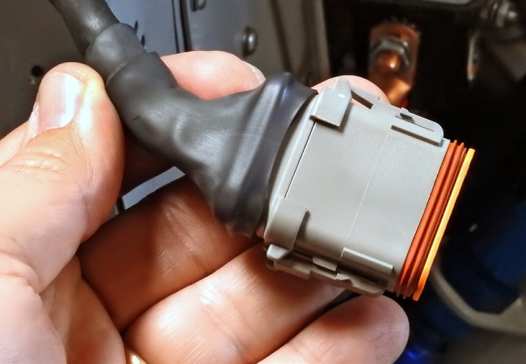
Jack, so if a harness is damaged at a race in Texas, he can build a new one in California and ship it overnight to their hotel. The crew keeps some duplicate /spare harnesses in the trailer when they are on the road, but if they take one out of the trailer, they order a replacement right away. Two quick-release weatherproof connectors are held up for comparison. The black connector is a Delphi Metri-Pack connector, which became common on OEM cars and trucks in the early 1990s. The gray connector is a Deutsch DT Series connector, which does the same job, but it’s more compact, and the rear flange allows the use of a more-effective sealed boot. Jack kept good documentation of the whole process. He also used all the instructions that come with the components. He’s a firm believer of reading the manual.
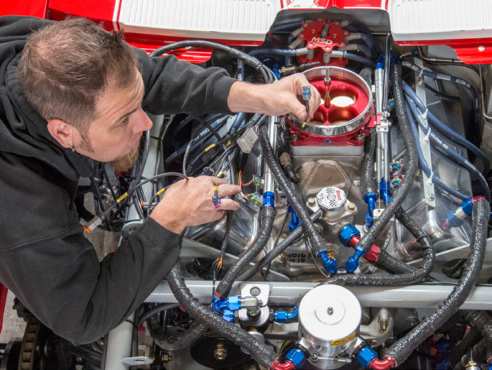
The last few wires were being connected to the engine so it could be started. The fuel injectors have been connected, but Jack worked on connecting the water temperature and intake air temperature sensors. Jack went the extra mile and shrink-wrapped labels to the wires for easy identification and tracing in the event of an electrical problem in the future. Eric Rhee was in the driver’s seat tuning the Holley Dominator EFI, and Jack was working on his laptop monitoring the RacePak data during the first startup of The Elephant ProCharged engine. Everything went smoothly, and RJ was happy.